I hope you had the chance to take a quick look at our last Android customization post, it was one of our helpful how-to posts instead of being an actual customization, just a brief tutorial on using Google Maps offline. This week we have a crazy project for you, using almost all of our favorite customization apps.
Join us as we put a custom notification on our Homescreen using Zooper Widget, Tasker, Pushbullet and IF.
Note: There are easier, and possibly better, methods to tackle the end product here today. Although I like what this project does, we are really here to focus on using and learning the programs behind it all.
![IF Pushbullet Tasker Zooper aa podcast logos]()
Get ready, we are about to revisit integrating four major customization apps into one flexible and highly customized product, a Homescreen widget that tells you when the latest Android Authority Podcast has been published.
Before we begin
You are going to need to pull out your saved Google Opinion Rewards budget today, or spend some cash. But, let’s start with the free apps:
IF in the Play StoreIF, which was formerly called IFTTT, standing for If This Then That, is free in the Google Play Store. Alternatively, you can get away with only using their web client today at ifttt.com, so you do not even need to install the app on your Android device, if you don’t want to.
Pushbullet in the Play StorePushbullet is also free in the Google Play Store. If you are not sure what Pushbullet is, be sure to check some of our previous projects and news on the app and service.
Tasker in the Play StoreTasker is $2.99 in the Google Play Store. While Tasker is not free, and is getting to be a really old app, it is still one of the most powerful Android customization tools around. Seriously, Tasker can take control of nearly any aspect of your device and allows you to automate so many things.
Zooper Widget in the Play StoreZooper Widget has a free version that will get you through most of today’s project, however, you may want to drop the $2.99 to get the Pro version of the app. Zooper Widget is a highly customizable Homescreen widget, allowing you to manually create functional, responsive and aesthetically diverse widgets.
What is this project, exactly?
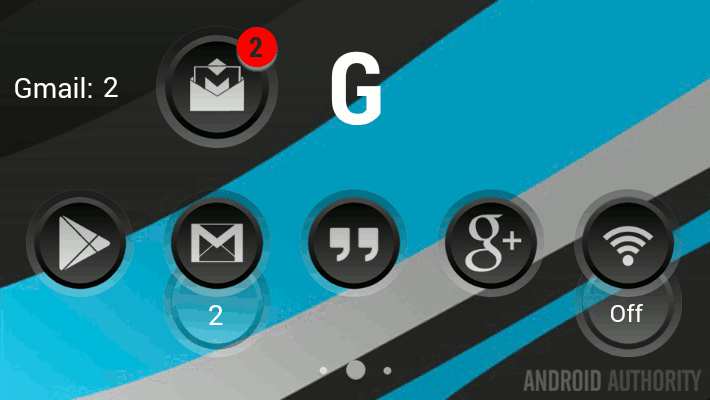
Our project today is to put a custom and fun notification on our device, based on an RSS feed. Specifically, we want notification when the newest AA Podcast has been published. You can use any RSS feed that you desire though.
![AA Podcast Notification widget]()
With that said, the actual goal today is to work with our favorite apps. As it so happens, each of the four apps – IF, Pushbullet, Tasker and Zooper Widget – have an important role in the project, and we get to work with their ability to integrate with each other, as follows:
IF uses a Pushbullet channel, Pushbullet is then linked into Tasker and Tasker then sends word to Zooper Widget to display our notification. The best tool for each job.
Let’s get started.
Custom RSS feed notification in a widget
As it so happens, alphabetical order is also the order in which our apps will operate for this project.
Part 1 – IF
If you are not a user of the IF Android app already, I would actually recommend proceeding on the web, instead of your Android device. IF is a powerful app that is fairly battery friendly, but there is no point eating juice just for this project. While the procedure remains the same for app and website, the actual process changes a little. I’ll try to show both at the same time.
Open IF, the site or the app, and look for the button to create a new recipe.
![IF Pushbullet AAPodcast this]()
For your this trigger, select Feed.
Select New feed item.
Enter your RSS URL, or put ours for the podcast: http://androidauthority.libsyn.com/rss
Click the big blue Create Trigger button.
Now click on that.
![IF Pushbullet AAPodcast that]()
Find and select Pushbullet. You may need to enable the Pushbullet channel, which may require you to go create a Pushbullet account so that you can provide IF the required access permission.
Select Push a note. I fully admit that there might be fun and more feature rich things you can do with the other Pushbullet actions, but we just want a simple notification from the service for now.
Change the Title to “New AAPodcast” or something that you can easily remember. You will need to enter this title later in today’s project, so take note of it.
Click Create Action.
Click Create Recipe.
![IF Pushbullet AA Podcast recipe]()
Very good, you may now exit IF.
You would think that the next app to open is Pushbullet – while you do need to make sure Pushbullet is installed, configured and able to access your device notifications (in Android Lollipop you would go to Settings -> Sound & notifications -> Notification access and grant Pushbullet the required access to notifications,) otherwise, there is no need to actually open the app for this project.
Part 2 – Tasker
In Tasker, we are going to need to create 2 Tasks and one Profile today. The first Task sets a variable for Zooper Widget to use, the second Task clears that variable and the Profile is what integrates with Pushbullet to trigger all the activity.
Open Tasker.
Task 1 – Notification counter
Create a new Task and name it something appropriate. I will call mine “NewAAPodcastNotify“.
Tap the “+” to add an action.
![Tasker AAPodcast variable set]()
Select Variables.
Select Variable Set.
Enter a new Variable name, make sure it is in all caps so that the variable is global. I called mine “%AAPOD“.
In the To section, we want to take our value (which will default to 0) and add 1 each time the Task is fired. To do so, enter the text “%AAPOD + 1“.
Turn on the toggle beside Do Maths. This actually should not be required, but it is better to be safe than sorry.
Tap the system Back button to save and exit this action.
Next, click the “+” button to start another action.
![Tasker AAPodcast zooper variable]()
Select Plugin.
Select Zooper Widget.
Tap the pencil to the right of Configuration.
What we are doing is creating a variable specifically for Zooper Widget to read.
In the ZW Variable field, enter a new variable name to be used later from within Zooper Widget. I called mine “AAPOD” to keep it simple, but you might consider calling it something like AAPODZ or ZWAAPOD, just remember to take a note of this variable for later.
Then, in the ZW Text field, enter the previous Tasker variable that you created, including the preceding % symbol. Mine was called “%AAPOD“.
Tap the system Back button to save and exit out of the Task creation.
Do you see how this all works? Every time this Task runs it adds 1 to the value of the Variable, then reports that to Zooper Widget so that it can act on the value.
![Tasker AAPodcast notification Task]()
We will now create your second Task,
Task 2 – Cleanup
This second Task is for cleanup purposes, you can skip this until later, but you will have to eventually come back to it or find a new way to tell your notification to turn off.
Start a new Task and give it an appropriate name, I’ve called mine “ClearAAPod“.
Tap the “+” button to add a new action.
![Tasker AAPodcast variable clear]()
Select Variable.
Select Variable Set.
Tap the tag icon on the right side of the Variable name field and chose your previously created podcast variable, if you recall, mine was called “%AAPOD“.
In the To section, simply enter the value 0.
Click the system Back button to save out of this action. We now need to add another action to the Task.
We will actually be duplicating the ZW variable set action from our other Task, feel free to copy and paste that instead of creating something new here, otherwise:
Tap the “+” again to add another action.
![Tasker AAPodcast zooper variable]()
Select Plugin.
Select Zooper Widget.
Tap the pencil to the right of Configuration.
In the ZW Variable field, enter your previously chosen variable name for Zooper Widget. I had called mine “AAPOD” but you might have gone with AAPODZ or ZWAAPOD or something.
Then, in the ZW Text field, enter the Tasker variable again, including the preceding % symbol. Mine was called “%AAPOD“.
Tap the system Back button to save and exit out of the Task creation.
What happens now, when this Task is run it will clear the variable back to 0 and report that variable to Zooper Widget to act upon.
Optional: What app do you use to listen to the AA Podcast? If you want your project today to open that app, now is the time to enter that procedure. In my case, I want to launch SoundCloud when a new AA Podcast is published and this Task is run. Simply create a new action, select App -> Launch App then choose the app you would like to launch.
![Tasker AAPodcast open soundcloud]()
Now hit that system back button to save and exit.
![Tasker AAPodcast clear notification Task]()
We will create our Profile now.
Profile – Watch for the Pushbullet notification and take action
Start your new Profile, name it appropriately, if applicable to your setup.
Select Event.
![Tasker AAPodcast pushbullet Profile]()
Select Plugin.
Select Pushbullet.
Tap the edit button beside the word Configuration. Enter the values as follows:
If I receive a note
Under Containing the text, replace “Optional filter” with your note from IF, I had entered “New AAPodcast“.
I recommend then dismissing or even deleting the push, but you can leave it, if you want to see the Pushbullet notification as well as our completed Homescreen widget notification.
Tap the check mark in the very top right corner to save the Pushbullet settings, then hit the system Back button to save and back out of the Event editing.
Choose your notification trigger Task, I had called mine “NewAAPodcastNotify.”
![Tasker AAPodcast pushbullet notification Profile]()
That will do it for Tasker, go ahead and back out to your Homescreen. Let’s move on to Zooper Widget. We’re almost done.
Part 3 – Zooper Widget
You may handle this in several different ways, but for today, I am going to create a Zooper widget that displays nothing by default, then it will display an image and text when a new podcast is published. Finally, when I click on that image that popped up, it will dismiss the image and text back to nothing, and open my favorite podcast app to listen to the new episode.
Pull out your creativity cap, it’s time to design a widget.
I will leave you to design a new Zooper Widget and decide how you want it to look. Consider how it will look by default, then how it will look when there is a notification. You will probably want to first set it up as it will appear when there is a notification, then we’ll use advanced code to manipulate it to your default view. Let’s go through that.
![IF Pushbullet Tasker Zooper Widget AA Podcast]()
As you can see, I have just two elements in my Zooper Widget, a Bitmap and Text. In the designer, I set them up as they would be viewed when there is a notification. If you are also actually building this Android Authority Podcast notification, here, take this image for your design, if you want it.
![AA Podcast logo alpha]()
Let’s add code to hide the elements by default and pop them up when there is a notification. If you are not sure how we know if there is a notification, it was that Variable we set in Tasker – if the Variable is 0, then there is no notification, if the Variable is 1 or higher, then there is a new Podcast, sounds so simple!
![Zooper Widget AAPodcast bitmap advanced]()
Click into the Bitmap image.
Scroll to the bottom and select Advanced Parameters.
Now we enter a conditional statement that tells the image to live in two different spots based on the Tasker variable. if you are following word for word so far today, here is the code you want:
$#TAAPOD#>0?[ox]0[/ox]:[ox]6000[/ox]$
Got it? I know, it’s been a while, so, that string says: If our Tasker variable is greater than 0, display our notification image at position X=0. Else, if the variable is at 0, then we want the image to display at position X=6000, or choose some other ridiculously high number that will put the image way off of the screen.
Hit that check mark to save the Advanced Parameters.
We will now instruct Zooper Widget to clean things up and open our podcast app when the image is clicked.
![Zooper Widget AAPodcast bitmap ontap]()
Select Module On Tap.
Swipe over to Shortcuts.
Select Task Shortcut.
Find and select your Tasker Task that cleans up the variable and launches your podcast app. Mine was called “ClearAAPOD.”
Review your Tasker Task and add an icon in the bottom right, then simply hit the system Back button to save and exit back to Zooper Widget.
We’re done here, hit the system Back button again to save out of the image settings.
Now, head into your Text element.
![Zooper Widget AAPodcast text advanced]()
Scroll part way down and select Edit text manually.
What we do here is have the text element display the value of the variable being sent over from Tasker. The code will be:
$#TAAPOD#=0? :#TAAPOD#$
Take note of the empty space after the “?”
In English: if our variable has a value of 0, show an empty space (which is really just showing nothing,) else, if the variable actually has a value, simply show the value.
Tap that check mark in the top right to save out of the Advanced Parameter, and hit the system Back button to save out of the Text element.
Guess what, you’re all done. Exit out of Zooper Widget and see what you’ve got.
What’s next
I probably don’t have to mention that you are going to need to be patient to see this project in action. Luckily, we record the podcast every Friday and try to publish over the weekend. If you really cannot wait, no worries, head back into Tasker, open the first Task you created today and hit the play/run button in the bottom left corner.
If you have manually run the first Task, don’t forget you’ll need to then run the second Task to clear things up. You should be able to click the image on the Zooper Widget, but you can also manually run it from within Tasker if you run into any issues.
Today’s project can be utilized for any RSS feed, including to collect all Android Authority posts (http://feed.androidauthority.com/) – just remember to open the AA app instead of your podcasting app when you setup the Tasker cleanup Task above.
One last thing, don’t forget that the actions you created here today in IF, through Pushbullet, and in Tasker can be utilized for any other project on your device, or even on a PC and more. IF and Pushbullet both have web and PC (and browser plugin) support, you could easily rig things to receive your notifications on your computer as well as your Android device. If you are interested, try this out for fun: When you click on the Zooper Widget notification, have it pop up a Tasker built window or voice input that allows you to choose whether to open your local podcast app or pass the notification off to your PC. This is all about choice, after all.
![Tasker AAPodcast voice input]()
Next week
I hope this monster of an Android customization project served as a reminder of the power of these great apps. We are big fans of IF, Pushbullet, Tasker and Zooper Widget, and we hope you are too. Let’s spend a bit more time working around IF again next week, in between the default Android actions and the integration with other great apps and services, I am sure we can find a cool way to do something fancy.
I am sure you guys will point out easier and more efficient ways to handle this same task today, and please do. My goal was for a project that uses all four of these cusomization apps, I kept it as simple as possible, but I’d love to see what differences you would make.